Summit and Rhododendron Trail Loop Hike

This mountaintop self-guiding nature trail, which is also a Kids In Parks TRACK trail, is a gem in North Carolina's northwest corner. You'll see virgin Northern Red Oak forests at an elevation near 5000 ft., as you stroll through an understory of Catawba rhododendron, which put on a showy display during June. And at one of the most spectacular of several cliff-top views, you'll find a heath bald with rare plant species - as well as a displaced Aspen forest!
At A Glance
 1.5 mi round-trip
Difficulty Rating: 1.99 ![]()
Tread Condition: Some Obstacles ![]()
Climb: Few Hills ![]()
Lowest Elevation: 4490 ft
Highest Elevation: 4683 ft
Climb Total: 195 ft
Configuration: Loop with two short out-and-back extensions
Starting Point: Picnic area near summit. Only one path leads through the picnic area and it continues to become the Summit Trail.
Trails Used: Summit, Rhododendron
Hike Start Location
Directions
From Boone, take US 421 to the intersection with US 221 North. Turn left; follow US 221 North for 13.7 miles to Mount Jefferson State Park Road; turn right (there is a brown sign ). It is 3.5 miles up the mountain to the park entrance. Proceed to the end of the road at the picnic area and park there.
Details
Hike Description
Although the park literature describes this hike as "strenuous", it is hardly that - maybe only to the casual picnicker who rarely strolls past the tables. In comparison to other hiking trails across Western North Carolina, this is a pleasant, easy hike through a magnificent forest on a high, prominent mountain. It doesn't get much better!

The hike starts in the picnic area and heads uphill immediately. The trail at this point follows a road, which is used by park staff to access the transmission towers on the summit. The climb is a bit steep, but the steep part is less than 1/4 mile long. The surface is hard-packed gravel, with no obstacles to hinder your progress.
Just after the road passes the restrooms for the picnic area, the lower part of the Rhododendron trail joins in on the right. Continue on the road, uphill. As you near the top, the road turns left and you reach the upper intersection with the Rhododendron trail. Bear left, staying on the road, to reach the summit and the towers on the summit.
There's not much to see on the actual summit, honestly. If you walk under the main tower, there is a better view, but the area doesn't have much of a wilderness feel to it and it's nothing compared to what you'll see later. A sign on a rocky outcrop proclaims the elevation to be 4,683'.

Return to the upper intersection with the Rhododendron trail. If you wish (and one is available), grab a guide booklet from the box a the start of the trail. This is also a Kids In Parks TRACK trail, so you can use one of the Adventure brochures such as "Animal Athletes", "Birds", "Hikin' to find Lichen", or "Natures Hide n' Seek" to guide you as well. Then head onto the Rhododendron trail into the woods to begin the loop portion of the hike. Now the real hiking begins.
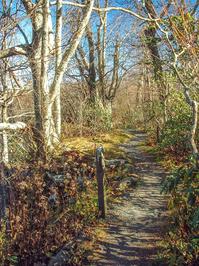
The trail is fairly level at first as it travels along the crest of the ridge. The surface of the trail is generally smooth with a few rocks and roots here and there. At several points an excellent cliff-top views open up to the left. You can see along the ridge to Luther Rock, where you're headed next. The fact that there are cliffs in the vicinity is proclaimed boldly by several bright signs warning about the danger of falling off of them. In seriousness - especially if you have children - be careful, because there is nothing to guard you from a fall.
As you walk, use the booklet to identify what you're seeing at each numbered post beside the trail. There is a wealth of information in there; though some of it is hopelessly outdated, a lot can be gleaned with a careful study. You can even use the outdated information in the booklet in conjunction with what you see to learn how the natural environment has changed over the years.
For example, at post number 7, the guide talks about the American Chestnut, and states that a tall, dead trunk still stands. Well, the trunk has long since fallen and you can see it lying on the ground in front of the post. But the guide then mentions older and younger sprouts, and here you can see at least three distinct sizes of Chestnut sprouts growing from the base of the fallen log. Unfortunately, these sprouts won't get as big as the original trunk because they're still being killed by the Chestnut blight, but there's no telling how many years the old root system will continue to send up new sprouts that survive long enough for hikers to see.
The overstory here is primarily a virgin Northern Red Oak forest growing on the dry ridgeline. The trees on this exposed mountaintop are buffeted by strong winds. Big, gnarled limbs reach out from thick, stocky trunks. I suppose these short trees wouldn't have been very valuable as timber - which is why they were never logged - but as a forest, they're more valuable than we can even begin to imagine. Also notice that, to your left, you see many maples and birches growing on the cool, moist north slope of the mountain. More often than not it's a gradual, slow transition from the trees that like to grow on dry ridges, into the trees that thrive in moist coves. But here, it's easy to see how micro-climates can affect the forest in only a very short distance.
All along the entire loop, you will notice an understory of Rhododendron and Mountain Laurel shrubs, the former for which the trail is named. The Rhododendrons are short and scraggly, with big, long, waxy leaves. The mountain laurels are similar, but the leaves are smaller and rounder. In mid June and sometimes into July, these plants put on a spectacular display of purple flowers. That would be an excellent time of year to do this hike.
Soon you'll reach another intersection, with a map and an information board where you can read a detailed account about the environment you'll soon be entering. Turn left here and ascend for just a couple hundred feet to Luther Rock. You'll pop out of the forest onto a small heath bald surrounding a rock outcrop. There's a great view. You can continue down a short ways where the trail dead-ends.

What few trees grow around Luther Rock are very short - most of the vegetation consists of blueberry bushes with rare ferns growing beneath them. Looking down below Luther Rock, back toward the summit, you'll see one of the truly unique aspects of this particular mountain's environment: a patch of Bigtooth Aspen forest! These trees normally grow much farther north and west, in New England and the Rockies, but don't tell that to this patch of trees. They look perfectly comfortable growing below this rocky, wind-blown summit. There is at least one other stand of Bigtooth Aspen in North Carolina, but those two might be it, depending on who you ask.
When you're finished soaking in the view, go back down the trail to the sign board and then turn left. The trail descends a little ways on a well-built path. It travels through a forest that is a bit more protected from the elements, on the south side of the mountain, and the trees are therefore a bit taller. You'll see some Basswood and Ash trees, which don't grow right on the summit. Although you don't descend far from the summit - maybe 100' - the forest is immediately and noticeably different. You may want to look down while walking along this stretch of trail too: several species of wildflowers grow here primarily during the spring.
Soon, you'll find yourself following some type of metal pipe or conduit. Just past that you'll be back at the road to the summit. Turn left, and head back to the parking area to reach your vehicle and the end of this hike.
All Photos from This Hike


Map
Green highlight indicates the route to follow within the trail network for this hike.
Tip: Printing this map? You can pan and zoom the map as desired before printing to show the area you need.
Map Information
Download GPS Data
Click on a route, trail, or point on the map and select the GPS Data tab to download its data.
Data Formats
KML (Google Earth)
KML is the main file type used by Google Earth. If you have Google Earth installed, clicking the KML link should open the trail or point directly in Google Earth for viewing. This is the native file format used by Google Earth, but many other map applications can use and understand KML as well, so if you're not sure which one to download, KML is a good bet.
GPX
The GPX format stands for GPS Exchange - a free, open, XML format for exchanging GPS and map data. GPX is compatible with Google Earth, many other mapping programs, and most GPS devices (such as Garmin). Load the file directly into your GPS to help find your way on your next trip!
GeoJSON
GeoJSON is a newer, lightweight data exchange format which can be used to quickly share map data and may have a smaller size than KML or GPX. Many professional mapping and GIS applications support the GeoJSON format.
About the Map
Copyright
Base Layers
Base layers provided by OpenStreetMap, the US Geological Survey, the US Forest Service, and NC OneMap. Base layer images are subject to the respective copyright policies of their owners. Base layers may not be available at all times due to system maintenance or outages.
WNCOutdoors Base Layer
The WNCOutdoors Base layer is provided by WNCOutdoors.info. It is licensed by Creative Commons Attribution 3.0.
Trail and Marker Overlays
Trail layers and downloadable data are all original works created by WNCOutdoors with guidance from a variety of sources, including ensembles of our own GPS tracks, user contributed GPS tracks, official maps and GIS data from government agencies, and field observations. WNCOutdoors data is made freely available under the Open Database License - you are free to copy and use it for any purpose under the terms of that license (summary).
Tips
- Hover over a trail to see it highlighted. Helps to see start and end points for an individual trail.
- Scroll and zoom the map before printing, and that view will persist into the printed image.
- Click a trail for more details and to download it individually.
Feedback
Ratings
Average Rating: 4.5 (rated 4 times)
Rate It Now:

Donna Bissette said: For more of a workout, begin this hike from the ranger station at the bottom of the mountain right inside the gate to the park. You’ll add over a mile of a wooded uphill climb to the top. It includes a couple of road crossings, some decent views, some switchbacks, and some rocky, rooty hiking up the out and back trail from the bottom of the mountain, for a total of a little over five miles.